Segment Anything in KerasHub
Author: Tirth Patel, Ian Stenbit, Divyashree Sreepathihalli
Date created: 2024/10/1
Last modified: 2024/10/1
Description: Segment anything using text, box, and points prompts in KerasHub.
Overview
The Segment Anything Model (SAM) produces high quality object masks from input prompts such as points or boxes, and it can be used to generate masks for all objects in an image. It has been trained on a dataset of 11 million images and 1.1 billion masks, and has strong zero-shot performance on a variety of segmentation tasks.
In this guide, we will show how to use KerasHub's implementation of the Segment Anything Model and show how powerful TensorFlow's and JAX's performance boost is.
First, let's get all our dependencies and images for our demo.
!!pip install -Uq git+https://github.com/keras-team/keras-hub.git
!!pip install -Uq keras
!!wget -q https://raw.githubusercontent.com/facebookresearch/segment-anything/main/notebooks/images/truck.jpg
Choose your backend
With Keras 3, you can choose to use your favorite backend!
import os

os.environ["KERAS_BACKEND"] = "jax"

import timeit
import numpy as np
import matplotlib.pyplot as plt
import keras
from keras import ops
import keras_hub
Helper functions
Let's define some helper functions for visulazing the images, prompts, and the segmentation results.
def show_mask(mask, ax, random_color=False):
    if random_color:
        color = np.concatenate([np.random.random(3), np.array([0.6])], axis=0)
    else:
        color = np.array([30 / 255, 144 / 255, 255 / 255, 0.6])
    h, w = mask.shape[-2:]
    mask_image = mask.reshape(h, w, 1) * color.reshape(1, 1, -1)
    ax.imshow(mask_image)


def show_points(coords, labels, ax, marker_size=375):
    pos_points = coords[labels == 1]
    neg_points = coords[labels == 0]
    ax.scatter(
        pos_points[:, 0],
        pos_points[:, 1],
        color="green",
        marker="*",
        s=marker_size,
        edgecolor="white",
        linewidth=1.25,
    )
    ax.scatter(
        neg_points[:, 0],
        neg_points[:, 1],
        color="red",
        marker="*",
        s=marker_size,
        edgecolor="white",
        linewidth=1.25,
    )


def show_box(box, ax):
    box = box.reshape(-1)
    x0, y0 = box[0], box[1]
    w, h = box[2] - box[0], box[3] - box[1]
    ax.add_patch(
        plt.Rectangle((x0, y0), w, h, edgecolor="green", facecolor=(0, 0, 0, 0), lw=2)
    )


def inference_resizing(image, pad=True):
    # Compute Preprocess Shape
    image = ops.cast(image, dtype="float32")
    old_h, old_w = image.shape[0], image.shape[1]
    scale = 1024 * 1.0 / max(old_h, old_w)
    new_h = old_h * scale
    new_w = old_w * scale
    preprocess_shape = int(new_h + 0.5), int(new_w + 0.5)

    # Resize the image
    image = ops.image.resize(image[None, ...], preprocess_shape)[0]

    # Pad the shorter side
    if pad:
        pixel_mean = ops.array([123.675, 116.28, 103.53])
        pixel_std = ops.array([58.395, 57.12, 57.375])
        image = (image - pixel_mean) / pixel_std
        h, w = image.shape[0], image.shape[1]
        pad_h = 1024 - h
        pad_w = 1024 - w
        image = ops.pad(image, [(0, pad_h), (0, pad_w), (0, 0)])
        # KerasHub now rescales the images and normalizes them.
        # Just unnormalize such that when KerasHub normalizes them
        # again, the padded values map to 0.
        image = image * pixel_std + pixel_mean
    return image
Get the pretrained SAM model
We can initialize a trained SAM model using KerasHub's from_preset factory method. Here,
we use the huge ViT backbone trained on the SA-1B dataset (sam_huge_sa1b) for
high-quality segmentation masks. You can also use one of the sam_large_sa1b or
sam_base_sa1b for better performance (at the cost of decreasing quality of segmentation
masks).
model = keras_hub.models.SAMImageSegmenter.from_preset("sam_huge_sa1b")
Understanding Prompts
Segment Anything allows prompting an image using points, boxes, and masks:
- Point prompts are the most basic of all: the model tries to guess the object given a point on an image. The point can either be a foreground point (i.e. the desired segmentation mask contains the point in it) or a backround point (i.e. the point lies outside the desired mask).
- Another way to prompt the model is using boxes. Given a bounding box, the model tries to segment the object contained in it.
- Finally, the model can also be prompted using a mask itself. This is useful, for instance, to refine the borders of a previously predicted or known segmentation mask.
What makes the model incredibly powerful is the ability to combine the prompts above. Point, box, and mask prompts can be combined in several different ways to achieve the best result.
Let's see the semantics of passing these prompts to the Segment Anything model in KerasHub. Input to the SAM model is a dictionary with keys:
"images": A batch of images to segment. Must be of shape(B, 1024, 1024, 3)."points": A batch of point prompts. Each point is an(x, y)coordinate originating from the top-left corner of the image. In other works, each point is of the form(r, c)whererandcare the row and column of the pixel in the image. Must be of shape(B, N, 2)."labels": A batch of labels for the given points.1represents foreground points and0represents background points. Must be of shape(B, N)."boxes": A batch of boxes. Note that the model only accepts one box per batch. Hence, the expected shape is(B, 1, 2, 2). Each box is a collection of 2 points: the top left corner and the bottom right corner of the box. The points here follow the same semantics as the point prompts. Here the1in the second dimension represents the presence of box prompts. If the box prompts are missing, a placeholder input of shape(B, 0, 2, 2)must be passed."masks": A batch of masks. Just like box prompts, only one mask prompt per image is allowed. The shape of the input mask must be(B, 1, 256, 256, 1)if they are present and(B, 0, 256, 256, 1)for missing mask prompt.
Placeholder prompts are only required when calling the model directly (i.e.
model(...)). When calling the predict method, missing prompts can be omitted from the
input dictionary.
Point prompts
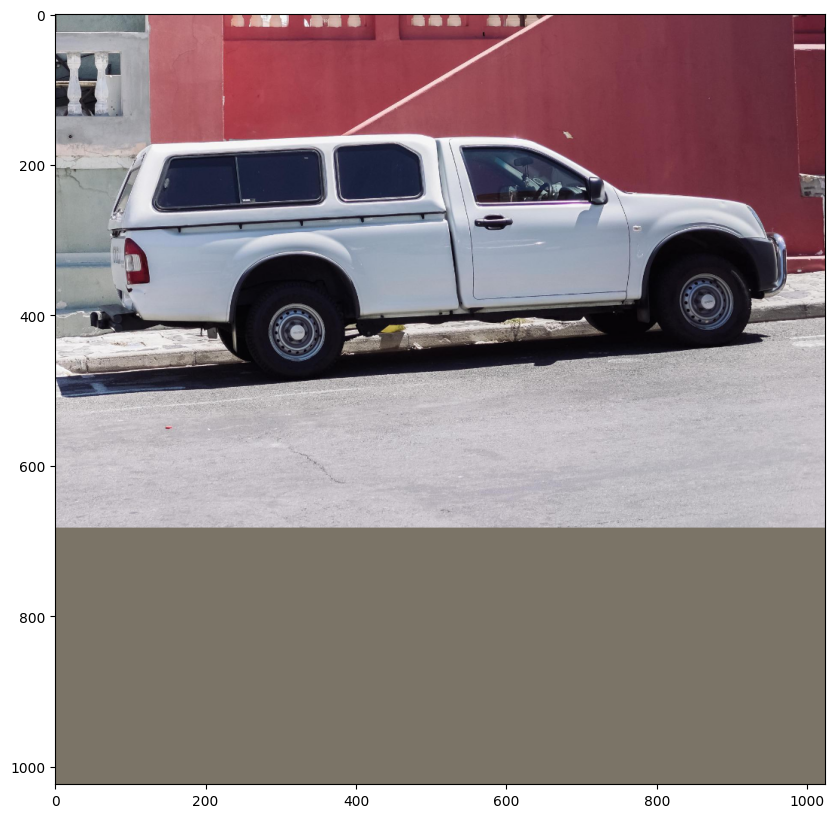
First, let's segment an image using point prompts. We load the image and resize it to
shape (1024, 1024), the image size the pretrained SAM model expects.
# Load our image
image = np.array(keras.utils.load_img("truck.jpg"))
image = inference_resizing(image)

plt.figure(figsize=(10, 10))
plt.imshow(ops.convert_to_numpy(image) / 255.0)
plt.axis("on")
plt.show()
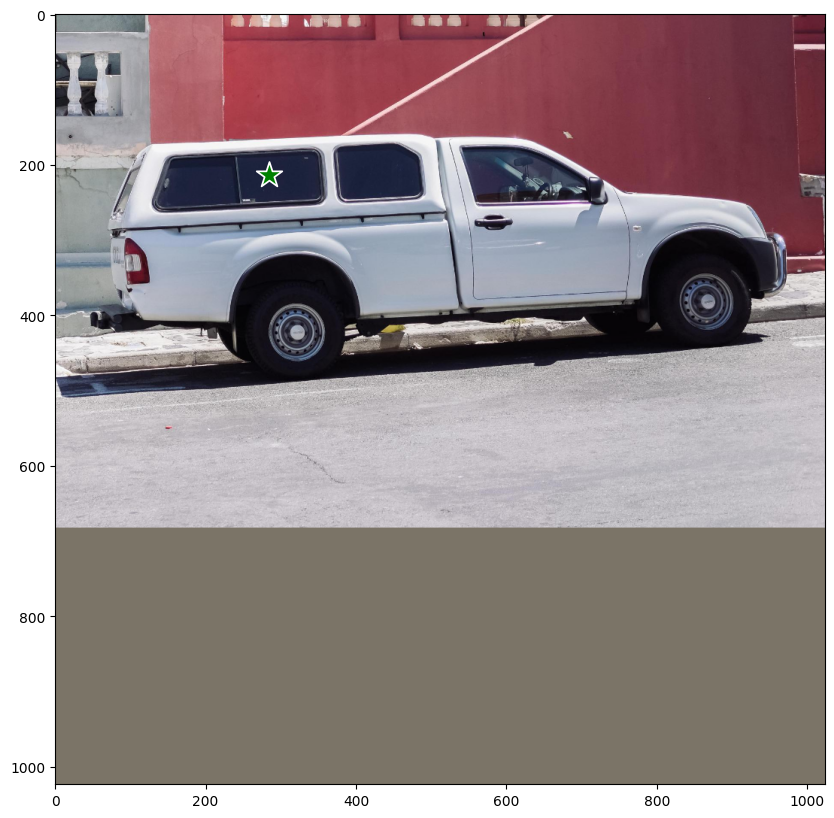
Next, we will define the point on the object we want to segment. Let's try to segment the
truck's window pane at coordinates (284, 213).
# Define the input point prompt
input_point = np.array([[284, 213.5]])
input_label = np.array([1])

plt.figure(figsize=(10, 10))
plt.imshow(ops.convert_to_numpy(image) / 255.0)
show_points(input_point, input_label, plt.gca())
plt.axis("on")
plt.show()
Now let's call the predict method of our model to get the segmentation masks.
Note: We don't call the model directly (model(...)) since placeholder prompts are
required to do so. Missing prompts are handled automatically by the predict method so we
call it instead. Also, when no box prompts are present, the points and labels need to be
padded with a zero point prompt and -1 label prompt respectively. The cell below
demonstrates how this works.
outputs = model.predict(
    {
        "images": image[np.newaxis, ...],
        "points": np.concatenate(
            [input_point[np.newaxis, ...], np.zeros((1, 1, 2))], axis=1
        ),
        "labels": np.concatenate(
            [input_label[np.newaxis, ...], np.full((1, 1), fill_value=-1)], axis=1
        ),
    }
)
SegmentAnythingModel.predict returns two outputs. First are logits (segmentation masks)
of shape (1, 4, 256, 256) and the other are the IoU confidence scores (of shape (1,
4)) for each mask predicted. The pretrained SAM model predicts four masks: the first is
the best mask the model could come up with for the given prompts, and the other 3 are the
alternative masks which can be used in case the best prediction doesn't contain the
desired object. The user can choose whichever mask they prefer.
Let's visualize the masks returned by the model!
# Resize the mask to our image shape i.e. (1024, 1024)
mask = inference_resizing(outputs["masks"][0][0][..., None], pad=False)[..., 0]
# Convert the logits to a numpy array
# and convert the logits to a boolean mask
mask = ops.convert_to_numpy(mask) > 0.0
iou_score = ops.convert_to_numpy(outputs["iou_pred"][0][0])

plt.figure(figsize=(10, 10))
plt.imshow(ops.convert_to_numpy(image) / 255.0)
show_mask(mask, plt.gca())
show_points(input_point, input_label, plt.gca())
plt.title(f"IoU Score: {iou_score:.3f}", fontsize=18)
plt.axis("off")
plt.show()
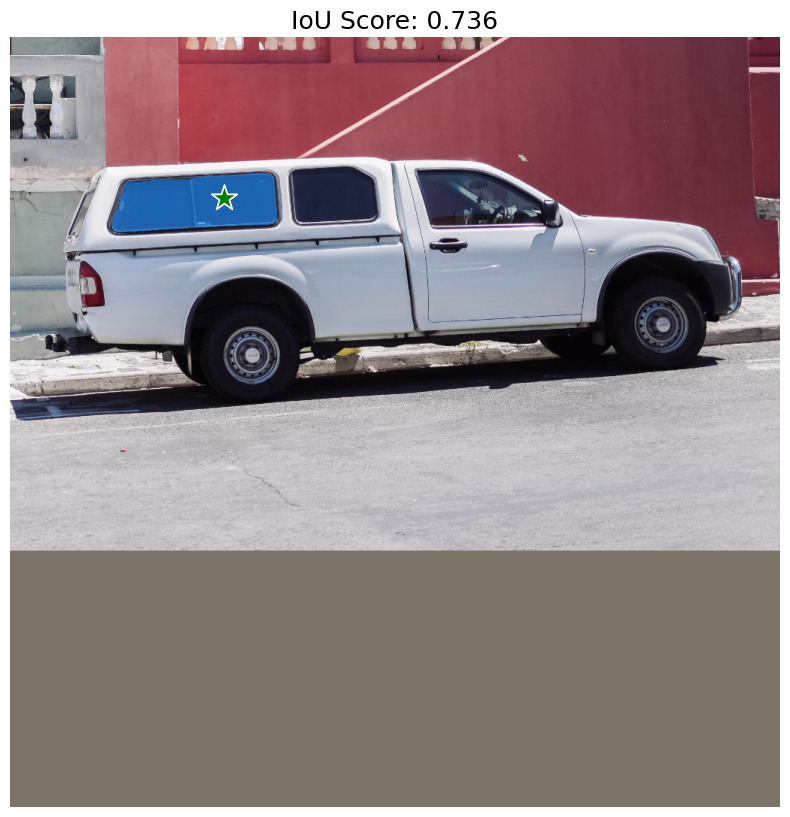
As expected, the model returns a segmentation mask for the truck's window pane. But, our point prompt can also mean a range of other things. For example, another possible mask that contains our point is just the right side of the window pane or the whole truck.
Let's also visualize the other masks the model has predicted.
fig, ax = plt.subplots(1, 3, figsize=(20, 60))
masks, scores = outputs["masks"][0][1:], outputs["iou_pred"][0][1:]
for i, (mask, score) in enumerate(zip(masks, scores)):
    mask = inference_resizing(mask[..., None], pad=False)[..., 0]
    mask, score = map(ops.convert_to_numpy, (mask, score))
    mask = 1 * (mask > 0.0)
    ax[i].imshow(ops.convert_to_numpy(image) / 255.0)
    show_mask(mask, ax[i])
    show_points(input_point, input_label, ax[i])
    ax[i].set_title(f"Mask {i+1}, Score: {score:.3f}", fontsize=12)
    ax[i].axis("off")
plt.show()

Nice! SAM was able to capture the ambiguity of our point prompt and also returned other possible segmentation masks.
Box Prompts
Now, let's see how we can prompt the model using boxes. The box is specified using two points, the top-left corner and the bottom-right corner of the bounding box in xyxy format. Let's prompt the model using a bounding box around the left front tyre of the truck.
# Let's specify the box
input_box = np.array([[240, 340], [400, 500]])

outputs = model.predict(
    {"images": image[np.newaxis, ...], "boxes": input_box[np.newaxis, np.newaxis, ...]}
)
mask = inference_resizing(outputs["masks"][0][0][..., None], pad=False)[..., 0]
mask = ops.convert_to_numpy(mask) > 0.0

plt.figure(figsize=(10, 10))
plt.imshow(ops.convert_to_numpy(image) / 255.0)
show_mask(mask, plt.gca())
show_box(input_box, plt.gca())
plt.axis("off")
plt.show()
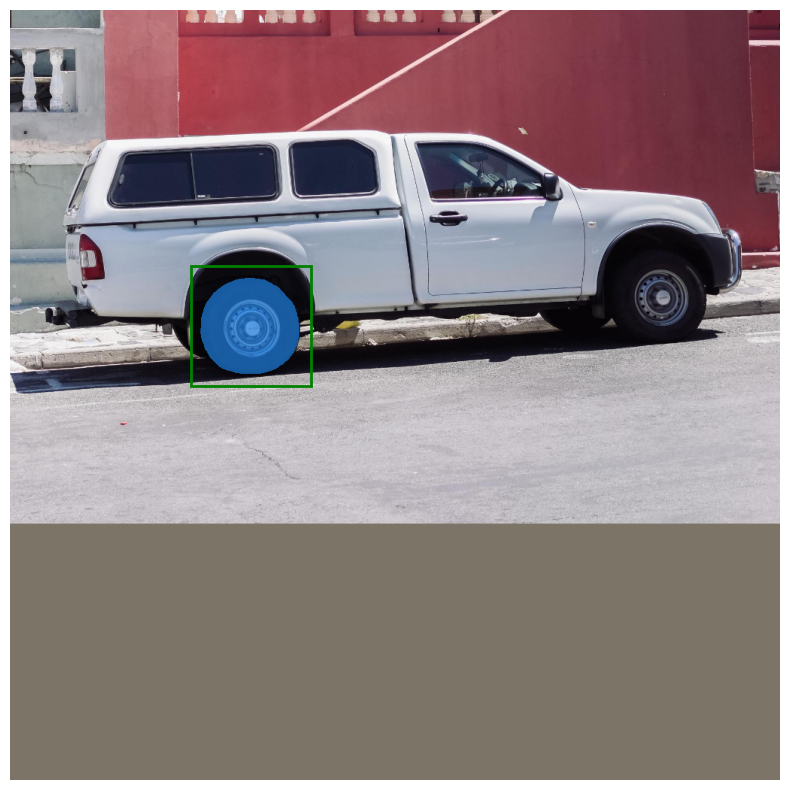
Boom! The model perfectly segments out the left front tyre in our bounding box.
Combining prompts
To get the true potential of the model out, let's combine box and point prompts and see what the model does.
# Let's specify the box
input_box = np.array([[240, 340], [400, 500]])
# Let's specify the point and mark it background
input_point = np.array([[325, 425]])
input_label = np.array([0])

outputs = model.predict(
    {
        "images": image[np.newaxis, ...],
        "points": input_point[np.newaxis, ...],
        "labels": input_label[np.newaxis, ...],
        "boxes": input_box[np.newaxis, np.newaxis, ...],
    }
)
mask = inference_resizing(outputs["masks"][0][0][..., None], pad=False)[..., 0]
mask = ops.convert_to_numpy(mask) > 0.0

plt.figure(figsize=(10, 10))
plt.imshow(ops.convert_to_numpy(image) / 255.0)
show_mask(mask, plt.gca())
show_box(input_box, plt.gca())
show_points(input_point, input_label, plt.gca())
plt.axis("off")
plt.show()
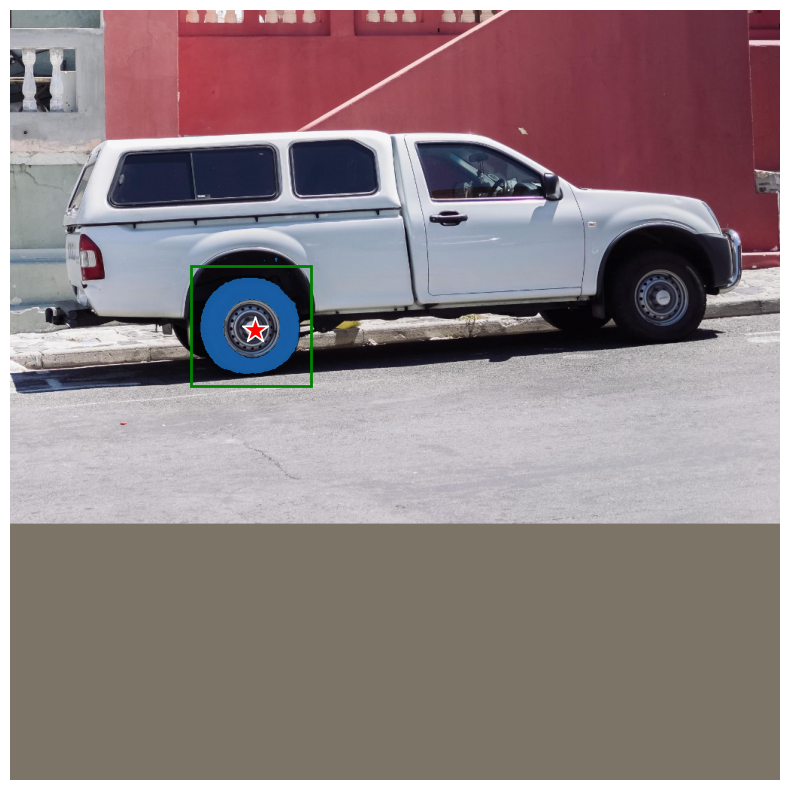
Voila! The model understood that the object we wanted to exclude from our mask was the rim of the tyre.
Text prompts
Finally, let's see how text prompts can be used along with KerasHub's
SegmentAnythingModel.
For this demo, we will use the
offical Grounding DINO model.
Grounding DINO is a model that
takes as input a (image, text) pair and generates a bounding box around the object in
the image described by the text. You can refer to the
paper for more details on the implementation of the
model.
For this part of the demo, we will need to install the groundingdino package from
source:
pip install -U git+https://github.com/IDEA-Research/GroundingDINO.git
Then, we can install the pretrained model's weights and config:
!!pip install -U git+https://github.com/IDEA-Research/GroundingDINO.git
!!wget -q https://github.com/IDEA-Research/GroundingDINO/releases/download/v0.1.0-alpha/groundingdino_swint_ogc.pth
!!wget -q https://raw.githubusercontent.com/IDEA-Research/GroundingDINO/v0.1.0-alpha2/groundingdino/config/GroundingDINO_SwinT_OGC.py
from groundingdino.util.inference import Model as GroundingDINO

CONFIG_PATH = "GroundingDINO_SwinT_OGC.py"
WEIGHTS_PATH = "groundingdino_swint_ogc.pth"

grounding_dino = GroundingDINO(CONFIG_PATH, WEIGHTS_PATH)
Let's load an image of a dog for this part!
filepath = keras.utils.get_file(
    origin="https://storage.googleapis.com/keras-cv/test-images/mountain-dog.jpeg"
)
image = np.array(keras.utils.load_img(filepath))
image = ops.convert_to_numpy(inference_resizing(image))

plt.figure(figsize=(10, 10))
plt.imshow(image / 255.0)
plt.axis("on")
plt.show()
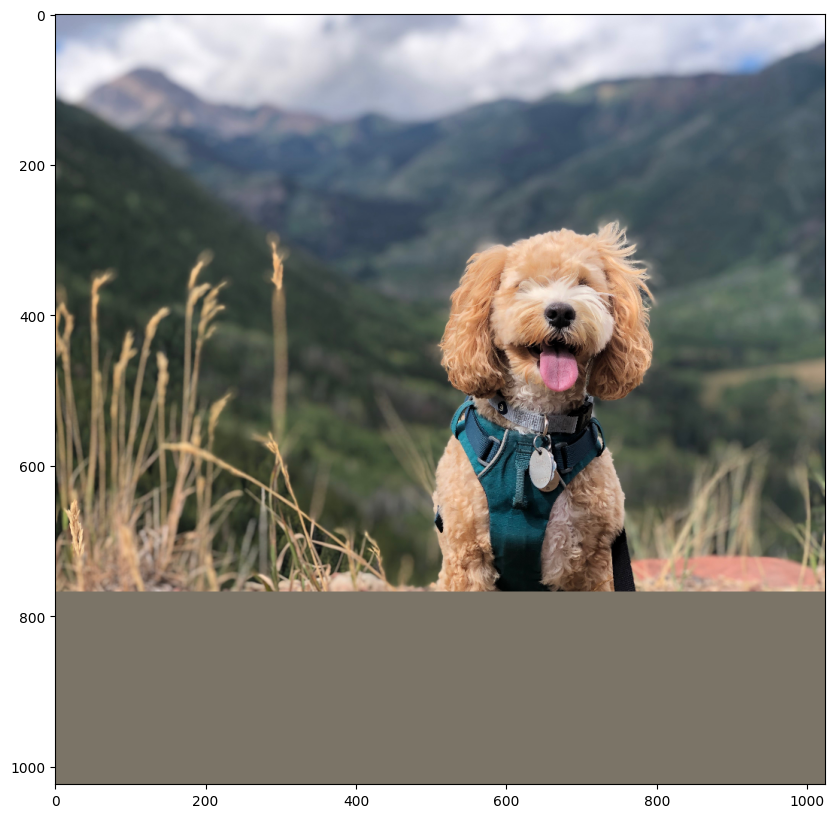
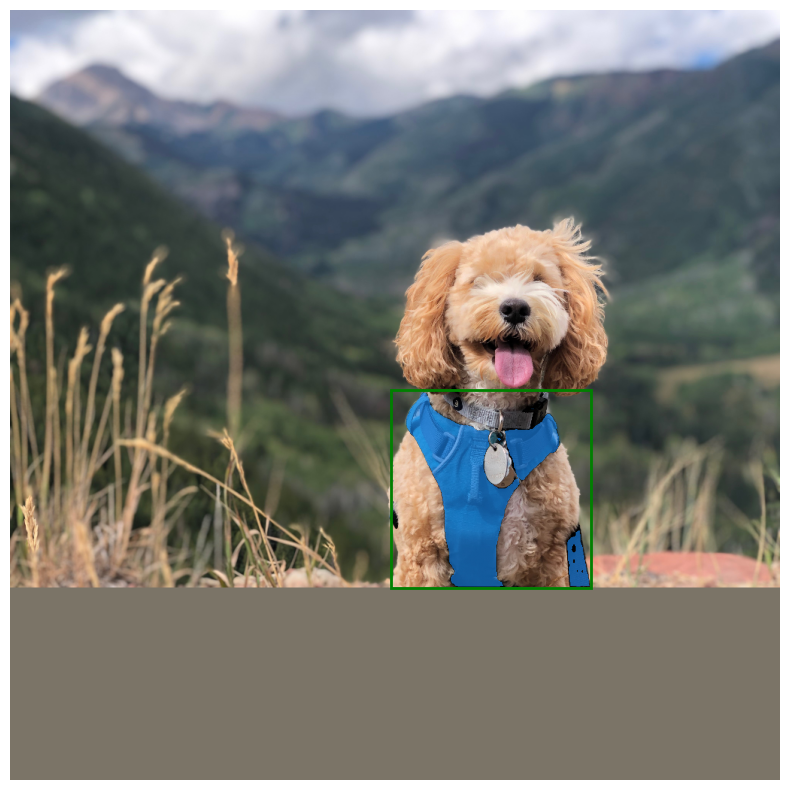
We first predict the bounding box of the object we want to segment using the Grounding DINO model. Then, we prompt the SAM model using the bounding box to get the segmentation mask.
Let's try to segment out the harness of the dog. Change the image and text below to segment whatever you want using text from your image!
# Let's predict the bounding box for the harness of the dog
boxes = grounding_dino.predict_with_caption(image.astype(np.uint8), "harness")
boxes = np.array(boxes[0].xyxy)

outputs = model.predict(
    {
        "images": np.repeat(image[np.newaxis, ...], boxes.shape[0], axis=0),
        "boxes": boxes.reshape(-1, 1, 2, 2),
    },
    batch_size=1,
)
And that's it! We got a segmentation mask for our text prompt using the combination of Gounding DINO + SAM! This is a very powerful technique to combine different models to expand the applications!
Let's visualize the results.
plt.figure(figsize=(10, 10))
plt.imshow(image / 255.0)

for mask in outputs["masks"]:
    mask = inference_resizing(mask[0][..., None], pad=False)[..., 0]
    mask = ops.convert_to_numpy(mask) > 0.0
    show_mask(mask, plt.gca())
    show_box(boxes, plt.gca())

plt.axis("off")
plt.show()
Optimizing SAM
You can use mixed_float16 or bfloat16 dtype policies to gain huge speedups and memory
optimizations at releatively low precision loss.
# Load our image
image = np.array(keras.utils.load_img("truck.jpg"))
image = inference_resizing(image)

# Specify the prompt
input_box = np.array([[240, 340], [400, 500]])

# Let's first see how fast the model is with float32 dtype
time_taken = timeit.repeat(
    'model.predict({"images": image[np.newaxis, ...], "boxes": input_box[np.newaxis, np.newaxis, ...]}, verbose=False)',
    repeat=3,
    number=3,
    globals=globals(),
)
print(f"Time taken with float32 dtype: {min(time_taken) / 3:.10f}s")

# Set the dtype policy in Keras
keras.mixed_precision.set_global_policy("mixed_float16")

model = keras_hub.models.SAMImageSegmenter.from_preset("sam_huge_sa1b")

time_taken = timeit.repeat(
    'model.predict({"images": image[np.newaxis, ...], "boxes": input_box[np.newaxis,np.newaxis, ...]}, verbose=False)',
    repeat=3,
    number=3,
    globals=globals(),
)
print(f"Time taken with float16 dtype: {min(time_taken) / 3:.10f}s")
Here's a comparison of KerasHub's implementation with the original PyTorch implementation!
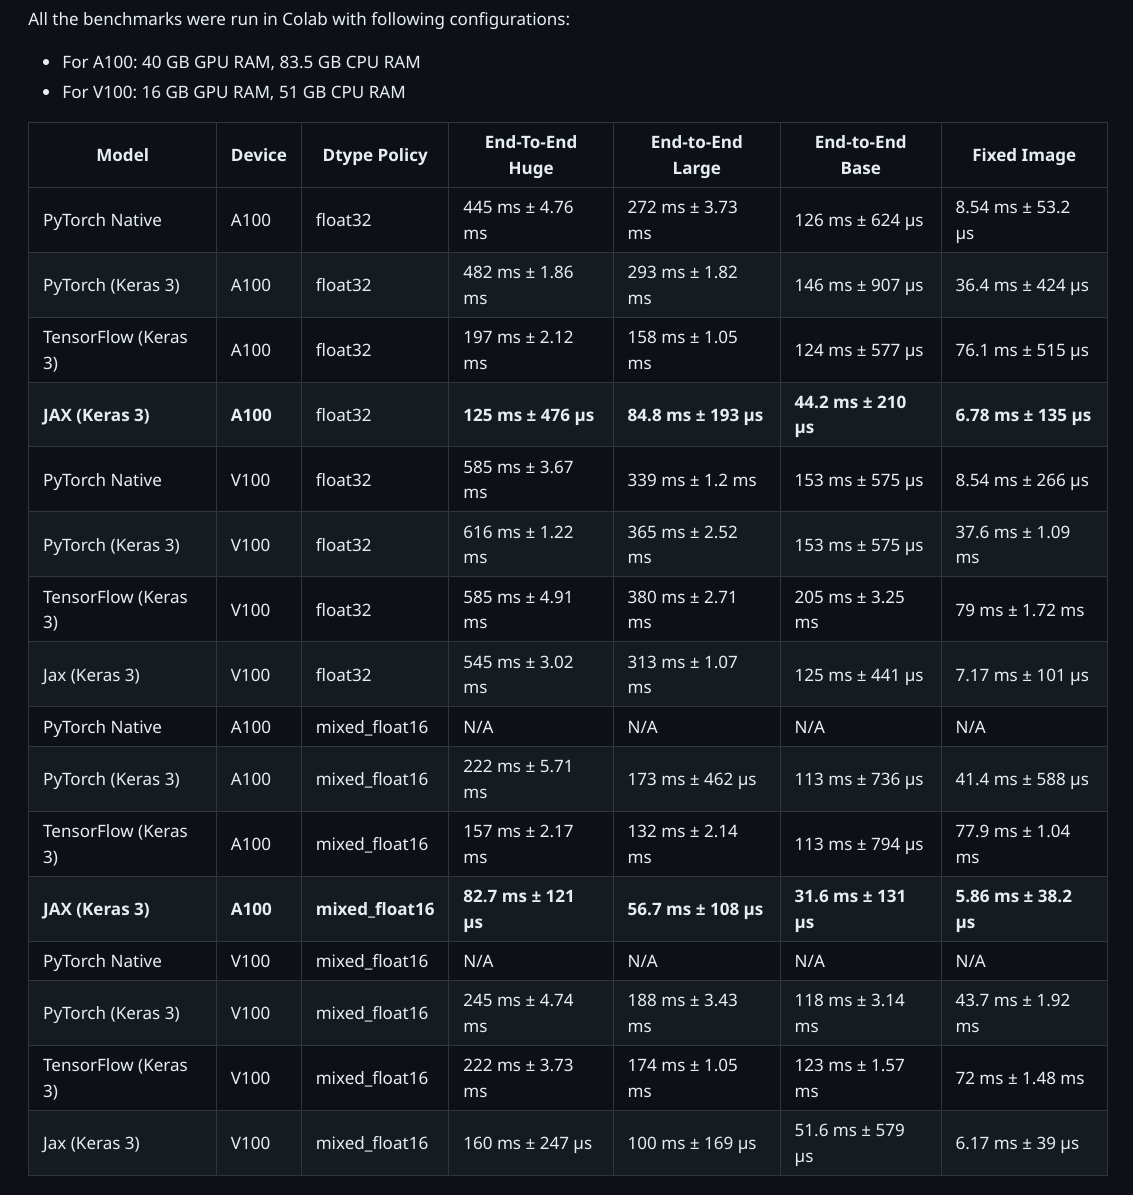
The script used to generate the benchmarks is present here.
Conclusion
KerasHub's SegmentAnythingModel supports a variety of applications and, with the help of
Keras 3, enables running the model on TensorFlow, JAX, and PyTorch! With the help of XLA
in JAX and TensorFlow, the model runs several times faster than the original
implementation. Moreover, using Keras's mixed precision support helps optimize memory use
and computation time with just one line of code!
For more advanced uses, check out the Automatic Mask Generator demo.
